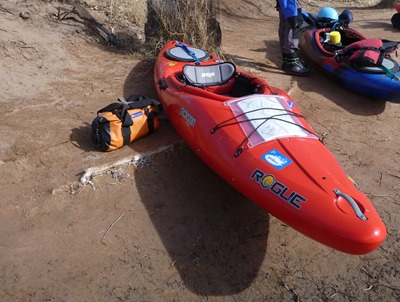
 Only in recent years has it become more common for kayakers to self-support the Grand Canyon. Even then, compared to the total number of people who go down the canyon, it’s still a fairly small number of people who take on the extra challenge of carrying all of their gear down the whole canyon. When we first decided to partake in this adventure, we scoured the internet for resources and queried our paddling friends for any advice they could provide on how to fit a raft’s worth of gear into a kayak. In the spirit of paying it forward, I have consolidated in this post what I learned and did for my self-support kayak trip down the Grand Canyon.
This isn’t meant to be a complete how-to for self-supporting the Grand Canyon, but it does contain lots of interesting lessons that I learned and that will hopefully be helpful to other aspiring self-supporters whether they are paddling the Grand or another river. If you have questions or comments, please use the comments field at the bottom.
Overview
One of the key approaches that our group chose to follow was to manage food and sleeping on a person-by-person basis. In other words, each individual brought their own stove, food, and tent which allowed us to take care of cooking chores based on our own dietary preferences and timing preferences and to get some good rest each night when and where we each wanted. With that in mind, you’ll see some duplication of gear that other groups might choose to split among themselves to save space and weight.
In preparing for the trip, we came across many great references which are referenced in the links below.
How to Self-Support
- http://www.canoekayak.com/skills/virtual-coach-how-to-self-support/
- http://www.redbull.com/en/adventure/stories/1331627038644/photos-climbing-the-grand-canyon-by-river-raft
- http://shanesliquidlogic.blogspot.com/2014/01/day-1-of-liquidlogic-self-support-grand.html?spref=fb
- http://youtu.be/gyvjJnfbo7c
- https://plus.google.com/+ShaneBenedict/posts
Regulations
- http://www.nps.gov/grca/planyourvisit/upload/Noncommercial_River_Trip_Regulations.pdf
- http://www.nps.gov/grca/photosmultimedia/riv-or01.htm
My Lists
Kayak
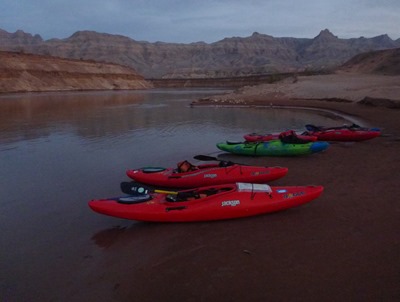 Without a doubt, the single most important piece of equipment for self-support kayaking the Grand Canyon is an appropriate whitewater kayak. As part of a very positive trend in recent years, there has been a dramatic increase in the number of cross-over kayaks that are intended to support both whitewater kayaking and flatwater kayaking. However, quietly in the back ground since about 2009, Jackson Kayak has been building their venerable Rogue kayaks that meet that exact purpose with a sealed hatch, bungee cords on the deck, and a skeg for true tracking.
The Jackson Rogue comes in two sizes—9 feet and 10 feet long. Although 5 out 6 of us paddled the larger 10’ Rogue due to the increased carrying capacity, I think it’s fair to say that the smaller people in the group would have appreciated the tighter outfitting of the smaller boat. Several of us benefitted from practicing in the Rogues prior to the trip on the Shoshone stretch of the Colorado River, through Westwater Canyon, and finally in the pool loaded with all of our actual gear. I would definitely recommend getting in your boat and practicing prior to your big trip.
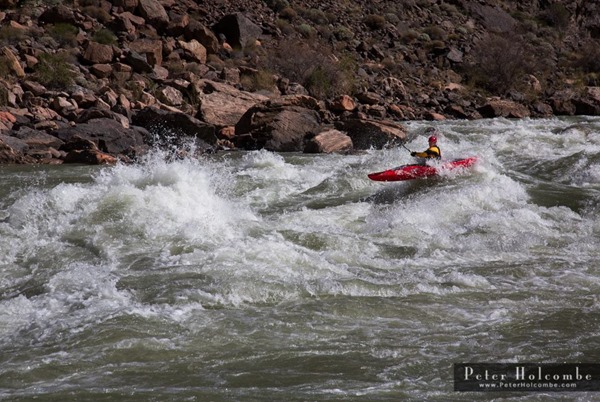
As for me at 6’1”, 200lbs, the Rogue 10 fit absolutely perfectly. I’ve been paddling Jackson kayaks since 2005 with every one of my boats (4Fun, Super Hero, Super Star, Villain S, Villain, Rockstar L, and Rogue 10) being a Jackson (except my old school Dancer), and I can honestly say that the Rogue 10 paddles the best of them all! I loved the speed of the long boat (check me out getting it airborne!) and found it incredibly predictable even heavily laden. Sure, it took time to maneuver in the big Grand Canyon rapids, but with my background in rowing a raft, I thought that was pretty easy to adjust to. The skeg made a noticeable improvement in tracking through the miles upon miles of flatwater, but be careful to raise it prior to beaching your boat or you’ll find it broken in half!
The bow swallowed up two dry bags and the groover tube with ease while the rear hatch was able to hold most of the remaining camping gear. In order to keep pesky mice out of our boats and from chewing through our dry bags at night, we enlisted the amazing (and generous) help of Landis at Wildwasser who built us custom cockpit covers that performed their job perfectly. I will provide more information on how I packed my boat each day in the last section of this article.
Food
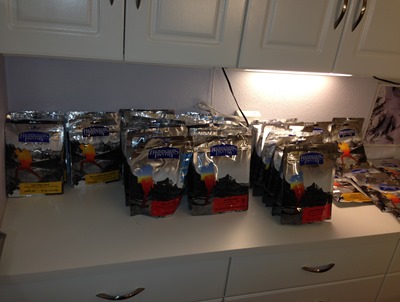 As I mentioned earlier, we decided to do food separately since it is such a personal issue for people. I kept things pretty simple by just eating Backpacker’s Pantry meals for every dinner. That allowed me to just heat water (no actual cooking) using my small JetBoil. Between dinner water and coffee (Starbucks Vias) water each morning, I only went through one and half of the smallest JetBoil canisters during our whole trip.
Even using dense, dehydrated food products, it was amazing how much space and weight 12 days of food took up. I measured the weights of my gear before and after the trip and wound up consuming 25 pounds of food and had 13 pounds left over at the end. Longer trip anyone?
You can check out my food list here including what I liked and what I didn’t eat much of during the trip.
Water
Similar to food, we each provided for our own water throughout the trip. Given the desert environment with few side creeks or springs, we were forced to filter water from the river each day. Prior to the trip, we were all concerned that the silty water might clog our filters, so we brought along collapsible buckets that would allow the sediment to settle prior to pumping. Personally, the bucket turned out to be more of a hassle than it was worth to me, since mine (Sea to Summit 20L) kept tipping over. I successfully used an MSR Miniworks EX filter each day with only cleaning it about 3 times. I pumped my water into an MSR 6 liter dromedary bag along with 2 Nalgene bottles and found that it was the perfect amount for all my drinking needs each day.
Groover
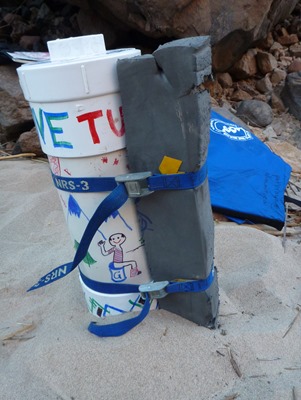 With all that food and water going in, you know that it has to come out eventually. Pursuant with the park service’s regulation to carry out human waste (see link at top of article), we had to carry sealable containers for our poop—aka groovers. Rather than reinvent the wheel (or toilet in this case), we followed the excellent advice provided by other groups as described in the following two links:
- http://kayakcamping.amongstit.com/2010/03/25/the-groover-aka-personal-human-waste-management-system/
- https://vimeo.com/10441949
Peter blazed the trail for us by procuring the PVC pipe and fabricating everyone one of the groovers for us, and we still owe him a huge thanks for doing so! He also figured out a way to install the groover between his legs by gluing foam to the top and bottom. I was a little lazy and just used ratchet straps to attach my foam and found that it also worked great throughout the whole trip. You can read about how I arrived at my mounting approach here.
Rather than making our deposits directly into the PVC pipes, we found it more sanitary to use Wag bags which were then securely stored within the PVC pipes. We kept all of our unused Wag bags and toilet paper inside each PVC pipe along with the used bags. I found that in order to economize space in the tube, it helped to cut the “neck” off each tied wag bag and to double up the number of wag bags per heavy duty zip lock.
As the trip progressed, the unused Wag bags and toilet paper were slowly consumed and the tube was replaced with full Wag bags. It might be gross, but after the trip I had to know what my conversion factor of food weight to waste weight was, so that’s right, I weighed my poop. And the answer? I had 8 pounds of poop compared to the 25 pounds of food I ate!
Firepan
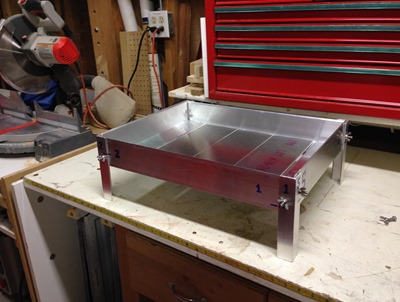 Another key regulation is to bring a fire pan with each group. As I turned out with the long paddling days, many camp chores, and need for lots of sleep each night, we never even wound up having a campfire during our trip. But due to the clever design you’ll read about, we were able to split the fire pan (same size that is required for rafts unfortunately) into parts that fit easily within our kayaks.
The instructions I used to build the fire pan were from the following site:
Thanks to advice from my friend, Scott, I didn’t even have to cute a single piece of metal! Instead, I ordered the pieces pre-cut from OnlineMetals.com. If you’re curious, you can duplicate the dimensions and order the same parts as described in my order receipt.
The only trick to fabricating the fire pan was drilling the holes in the correct locations while the rest of the pan remains in place. Even with dozens of clamps, I found it surprisingly frustrating but still very doable.
Solar Charging
I tried to limit the number of electronics gadgets I brought with me down the canyon, but as I described in my Proximity Waypoints article, I made regular use of my Garmin Fenix GPS watch and needed a way to charge it each day.
In order to provide reusable power throughout the trip, I packed along the compact Nomad 7 solar panel with Guide 10 Plus battery pack from GoalZero. With such short days and steep canyon walls, it was difficult to find much good time to use the charger. I considered strapping it under the bungee cords on the bow decking of my boat, but it would have blocked the view of my river map and would have been submerged far too often for me to feel comfortable about it possibly shorting out.
Instead, each time we stopped for lunch or a mid-day hike, I dutifully put the solar panel (with attached battery pack) into the sun for a few hours hoping for the best. And each night, I found that the battery pack was topped off and able to recharge my Fenix watch while I slept. It was a pretty mild charging scenario, but everything worked perfectly and I would definitely recommend the product to friends.
Boat Packing
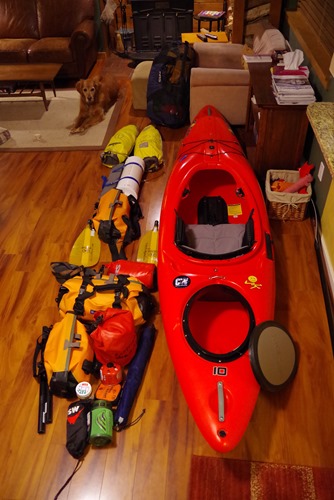 With so much gear, you’d have to wonder, “How’d you fit it all in your little kayak?”
Take a look at the photo to the right and you can see exactly how I packed my boat each day. Almost all my gear was contained within dry bags for safe keeping.
Starting at the front of the boat, I had two Wildwasser stow-floats that housed my sleeping gear (tent, sleeping bag, sleeping pad) in one bag (8.2 lbs) and food for the second half of the trip in the other (16.9 lbs). Each night, I removed the foot pegs (and place them in a safe, non-sandy place) and obviously pulled out the bag with sleeping gear, but I was able to leave the food bag until more than half way through the trip when I first opened it.
Between my legs and butting up against the bow bags, the groover tube fit comfortably. My heels pretty much rested on the floor of the kayak and against the groover tube while the balls of my feet pressed against the foot pegs. On my feet, I wore 5-10 Water Tennies and would highly recommend them.
Underneath one of my thighs, I kept my full MSR dromedary bag with a water bottle or two under the other thigh. Between my legs, my crotch, and the groover tube, I kept my Watershed Ocoee dry bag with day gear (10.6 lbs). It was a pretty tight fit with all the gear surrounding me, but it didn’t bother me at all throughout the trip.
Nestled under the sides of the seat were the blades from my Werner breakdown paddle. Behind the seat’s back band, I had a small NRS dry bag with my rain fly along with my cockpit cover and Chaco sandals.
Finally, opening up the cockpit cover I put one of the fire pan pieces, a larger Watershed Chattooga dry bag with cloths (11.5 lbs), another Ocoee dry bag with food (11.1 lbs), a larger NRS dry bag with fresh food (10.5 lbs), my JetBoil stove & fuel canisters, water filter, chair kit, break down paddle shafts, and assorted other items.
Amazingly, all 100+ pounds of gear fit in the boat day after day with little struggle!
If you have questions or comments about this article or self-support kayaking, please use the comments field below.
Back to Grand Canyon 2014 Main Page
Read the previous Grand Canyon 2014 article, Pine Creek Canyoneering
Continue reading Grand Canyon 2014 with the next article, Proximity Waypoints in the Grand Canyon
A big thanks to our friends at Jackson Kayak, Backpacker’s Pantry, and Watershed Dry Bags!




[…] Read the previous Grand Canyon 2014 article, Grand Canyon Gear Preparation […]